BRONZE SQUADRON SPECIAL OPERATIONS COMBAT MEDICAL HANDBOOK
1. COMBAT MEDICAL SECTION
The medical personnel within our squadron are organized into what is called the Combat Medical Section, and are the essential lifeline that keeps our unit healthy and capable of completing our mission. Medical personnel serve alongside their soldiers on the battlefield in a combat function, while also accepting the additional responsibility of providing essential medical care, supervision, and coordination with leadership elements to maximize unit effectiveness. When not in a mission setting, medical personnel will conduct training for their fellow soldiers and educate them on the equipment and techniques at their disposal, as well as how best to apply them when treating themselves and others.
2. RADIO COMMUNICATION
The radio is often the most vital tool you have in your inventory. Communication at all levels within medical personnel and between medical and team leadership is an essential component to providing the proper care and safety for both you and your casualty. Communicating with fellow medical personnel will allow you to receive the support and assistance that can make the difference in successfully saving lives on the battlefield, and communicating with team leadership will allow them to maintain accountability of your and the casualty's location, as well as set up proper security measures to allow you to keep you both safe. As a member of the medical section, you will be required to monitor two radio frequencies at all times:
| Frequency | Designation | Purpose |
|---|---|---|
| 41.0 (Anvil 1) / 42.0 (Anvil 2) | Team Net | Main method of communication between you and your team leadership |
| 39 | Medical Net | Communication with other medical personnel in the troop |
Team net will serve as the main method of communication between you and your team leadership. This net will be utilized to keep leadership apprised of all medical care and supplies under your supervision and will frequently be the main avenue of communication for them to inform you of anyone requiring medical attention.
Medical net will be used for you to communicate with other medical personnel in the troop in order to pass information back and forth and to coordinate logistics and care. Primary uses for medical net include:
Team Leader Incapacitated
If your team leader is incapacitated either by enemy fire or technical detachment, you should immediately inform your SARC on medical net and your team 2IC on team net. Communicating this information ensures that the chain of command remains intact and that any supporting units are able to assist until the situation is stabilized.
MCI and MASCAS
An MCI is any sudden influx of casualties, typically 3 or more or 33% of the element, which will severely impact the element's ability to continue with their tasking until treatment can be provided. This is important to communicate with leadership, both from a tactical and medical perspective, as it informs supporting elements that your team may be out of the fight temporarily while treating. When calling up an MCI, be sure to include the number of casualties involved, and if your team leader is involved, inform the next in the chain of command to step up. A "MASCAS" call signifies that the element has sustained an MCI that exceeds the medic's ability to provide proper treatment for all wounded. "MASCAS" is essentially the all-hands-on-deck call that alerts any nearby elements that you require immediate assistance and to make best speed to your location.
Medical Resupply Needed
Part of the duty of a SOCM is to be aware of the amount of medical supplies that are available to you and your team, and to verify that at all times you are capable of providing proper care should any casualties occur. This includes communicating with the soldiers under your care to verify that they have the supplies they need to self-aid should the need arise. Should you ever find you are running low on any supplies, send that information up medical net, and your SARC can coordinate either a resupply from their own stock or arrange for a resupply flight through command.
Any KIA and Identification
Should one of your soldiers fall in the field, you will want to send that information up both team and medical nets so that both can be aware that the element is down one soldier and to adjust accordingly. Once the communication has been sent up, pull the soldier's identifying paperwork and provide that to your SARC when practical for record-keeping purposes.
Additional Frequencies
In addition to these nets, leadership may ask you to attach to further frequencies depending upon what the mission may require. There will be times when you are attached to a specific team or element within your squad and they may have a separate frequency to differentiate comms (i.e., one element at a SBF position and another breacher element).
Radio Check
Once you have completed kitting up and are good to go, a radio check should be performed with any other medical personnel present. If the SARC will be present, it is best to reach out to them to conduct your radio check to confirm that they know you are present and ready to go, and provide them with an opportunity to disseminate any pertinent mission info that may arise prior to step off.
2. MEDICAL EQUIPMENT
Tourniquets
Slows severe bleeding in limbs. Casualty continues to bleed but at a much-diminished rate. Tourniquets are 60% faster to apply than bandages, which makes them useful when attempting to treat multiple bleeds rapidly or when conducting care under fire.
Bandages
Stops bleeding completely and are generally the first and most frequently used method of care.
Saline
Replaces lost blood volume. Two sizes available: 750ml and 1500 ml. 750ml provides a 33% increase to blood level and should be applied to any casualty with a class I or II Hemorrhage, 1500ml provides a 66% increase to blood level and is used on Class III and IV hemorrhages.
King LT
Opens and maintains the airway for casualties in the Supine position.
Oxygen Mask
Increases the breathing rate and SpO2 of a casualty.
First Aid Kit
Heals wounds, particularly those to the legs which limit casualty movement.
3. COMBAT LOADOUT
Whenever possible, medical equipment and medications should be stored in the combat medic's backpack. This is for two main reasons: Firstly, so that you can, at a glance, get an accurate count of your current inventory and any potential shortages, and secondly, so that both you and any other medical personnel know where your items are stored and can access them quickly. At the absolute minimum, your medical bag should contain:
- 10x Bandages
- 4x Tourniquets
- 10x Saline (5x 750ml, 5x 1500ml)
- 10x each of Morphine, Epinephrine, and Ammonium Carbonate
- 5x NCD and Chest Seal
- 3x Naloxone
- 3x Phenylephrine
- 3x Metroprolol
- 1x First Aid Kit
- (Recommended) 1x Oxygen Mask & 1x King LT
Again, these counts are the bare minimum you must carry in your bag, and more is preferable. It is strongly recommended that you carry additional Individual First Aid Kits (IFAKs) in both your vest and belt on top of your medical bag, as there can be times when we may not go out in full kit, and you will want to have medical equipment at all times, regardless of loadout. It is advisable to carry an additional 5x bandages, 1x tourniquet, 1x Morphine, 1x Epinephrine, 1x Ammonium Carbonate, 1x NCD, and 1x chest seal in both your vest and belt.
4. MEDICAL INTERACTIONS
It is important to be familiar with casualty anatomy as well as which treatments and medications can be applied to each of the particular body parts. When looking at a casualty, you can hold ALT to conduct a quick scan of the casualty, and any bleeds will be highlighted either in yellow or red, depending on the severity. Items in italics will only appear if the casualty is in need of treatment.
Chest
- Check Pulse
- Perform CPR
- Bandage (If equipped and needed)
- Use Chest Seal (If equipped and casualty has Open Pneumothorax)
- Perform Needle Decompression (If equipped and casualty has Tension Pneumothorax)
Abdomen
- Check Injuries
- Drag
- Carry
- Load Casualty in vehicle (ambulance only)
- Put on Back
- Put in Left Recovery
- Put in Right Recovery
- Bandage (If equipped and needed)
Head
- Check Pulse
- Check Respiratory Rate
- Lift Chin
- Bandage (If equipped and needed)
- Clear Vomit (If necessary)
- Put Oxygen Mask On (If equipped)
- Insert King LT (If equipped)
- Hold Under Nose (If Ammonium Carbonate equipped)
Arms
- Check Pulse
- Check Blood Pressure
- Check SpO2
- Apply Saline (If equipped and needed) (Can be applied to either arm but will always be placed on casualties Right Arm)
- Inject Morphine, Epinephrine, Metoprolol, Naloxone, Phenylephrine (If equipped)
- Bandage (If equipped and needed)
- Apply Tourniquet (If equipped and needed)
Legs
- Check Pulse
- Check Blood Pressure
- Inject Morphine, Epinephrine, Metoprolol, Naloxone, Phenylephrine (If equipped)
- Bandage (If equipped and needed)
- Apply Tourniquet (If equipped and needed)
Note: All equipment will use 1 item except for tourniquets, King LTs, and Oxygen Masks, which can be recovered once no longer needed. When treating multiple injuries, you will have to re-equip the item after utilizing it (i.e., when bandaging both arms, you will have to re-equip a second bandage after the one in your hand is used).
5. MEDICATIONS
Medications play a crucial role in the lifesaving care of any medical personnel, but can also cause as much harm as good if used improperly. Below is a list of all the medications utilized in the treatment of casualties, their effects, and their impacts on those receiving them.
Glossary
| Term | Definition |
|---|---|
| T Max | Time to maximum effect |
| T ½ | Time to Half Effect |
| TD50 | How many doses will render 50% of patients unconscious |
| LD50 | How many doses will cause cardiac arrest in 50% of patients |
Epinephrine ("Epi")
Used to increase HR and BP, and assists in restarting the heart when performing CPR.
| Metric | Value |
|---|---|
| T Max | 23 seconds |
| T ½ | 1 minute 3 seconds |
| LD50 | 4.4 |
Phenylephrine
Slows down bleeding and transfusion times, best utilized when a casualty has a Class IV hemorrhage to prevent exsanguination.
| Metric | Value |
|---|---|
| T Max | 29 seconds |
| T ½ | 1 minute 18 seconds |
| LD50 | 2.9 |
Metoprolol
Used to decrease HR and BP.
| Metric | Value |
|---|---|
| T Max | 25 seconds |
| T ½ | 1 minute 9 seconds |
| TD50 | 3.1 |
| LD50 | 3.8 |
Naloxone ("Narcan")
Used to counteract drug overdose.
| Metric | Value |
|---|---|
| T Max | 1 minute 35 seconds |
| T ½ | 7 minutes 26 seconds |
Ammonium Carbonate ("Smelling Salts")
Used to wake stable, unconscious casualties.
| Metric | Value |
|---|---|
| T Max | 2.3 seconds |
| T ½ | 3-4 seconds |
Morphine
Suppresses pain. Generally, should not be administered to unconscious patients as it both has a longer time to reach maximum effect and causes more drastic swings than Metoprolol.
| Metric | Value |
|---|---|
| T Max | 1 minute 57 seconds |
| T ½ | 15 minutes 20 seconds |
| TD50 | 3.1 |
| LD50 | 3.8 |
1. VITALS
Heart Rate (HR), Blood Pressure (BP), Hemorrhage Class, and Peripheral Oxygen Saturation (SpO2) all combine to make up what are known as vitals. These are the values used to determine your casualty's current medical status. A casualty for whom any of their vitals have fallen into a critical state will fall unconscious. If their vitals continue to drop, they may go into what is known as cardiac arrest, or a discontinuation of heart function and respiration. Once in cardiac arrest, the casualty will have approximately 5 minutes before irreparable damage to the brain occurs due to lack of blood and oxygen, and the casualty will expire.
Note: generally, HR and BP scale together, and our current medications affect both simultaneously. This means that BP can often be a redundant measurement, and most of the medic's attention can go toward HR. With that being said, it is important to be aware of BP in the instance where it may need to be medically managed within the casualty's stable HR range.
Stability Ranges
| State | HR (BPM) | BP | Hemorrhage Class | SpO2 (%) |
|---|---|---|---|---|
| Stable | 40 - 220 | 69/46 - 284/189 | Class I (> 70%) | > 85 |
| Unstable | < 40 | 64/79 | Class II (> 40%) | < 85 |
| Critical | < 30 | 51/34 | Class III (> 20%) | < 75 |
| Cardiac Arrest | < 20 | 51/34 | Class IV (< 19%) | < 65 |
2. CARDIOPULMONARY RESUSCITATION (CPR)
CPR is an emergency procedure utilizing chest compressions to maintain blood flow and oxygenation when a casualty is in cardiac arrest. CPR, in conjunction with the administration of epinephrine, is necessary in order to prevent the casualty from going KIA and to extend the amount of time available to provide care. CPR can now be provided continuously without the need to switch out providers. When conducting CPR as the only medical personnel on site, it is best to do so in stretches of 30 compressions, stopping to check both the casualty's pulse and verify their airway is still clear. If working in a pair, CPR can be conducted by one individual while the second monitors vitals and administers any medications.
NOTE: If checking pulse while CPR is being conducted, you will receive a reading even though the casualty's heart is still not beating on its own. BPM must be ABOVE 120 in order to discontinue CPR. Epinephrine should be utilized jointly with CPR when attempting to resume a normal heartbeat and can be applied once every minute, or after every second set of 30 chest compressions.
3. PNEUMOTHORAX
Pneumothorax, commonly known as a collapsed lung, is a condition where air leaks into the pleural space (the area between the lung and the chest wall), creating pressure that causes the lung to partially or fully collapse. There are two main forms of pneumothorax encountered in the field: Tension and Open.
Tension Pneumothorax
Tension pneumothorax, also known as a collapsed lung, occurs when air enters the pleural space but cannot escape, creating a one-way valve effect. This leads to rapidly increasing pressure that compresses the heart and major blood vessels, preventing oxygenation of the blood, and causing obstructive shock which requires immediate emergency intervention utilizing a needle chest decompression (NCD) kit.
Open Pneumothorax
An open pneumothorax, also known as a sucking chest wound, occurs when an external injury creates a hole in the chest wall, allowing air to flow directly between the atmosphere and the pleural cavity. This disrupts the negative pressure required for lung expansion, leading to lung collapse and respiratory distress. Treatment involves the application of a chest seal over the wound to prevent any further air flow into the chest cavity.
4. TACTICAL COMBAT CASUALTY CARE (TCCC)
While providing proper medical treatment to a casualty can be a daunting task on its own, members of the Combat Medical Section must also deal with the stressors of doing so under fire and simultaneously managing the tactical situation as well. A medical intervention at the wrong time or improper implementation of medications may lead to further casualties. Put another way, "Good medicine may be a bad tactical decision." It is important to have a grasp not only on the care of the casualty you are treating, but also on the situation in which you are treating them to prevent one casualty from turning into many. TCCC can generally be broken down into two distinct phases: Care Under Fire and Tactical Combat Care.
2. CASUALTY CARE PHASES
Care Under Fire (START)
Care rendered at the scene while both the medic and casualty are still taking effective hostile fire, and the risk of additional injuries at any moment due to hostile fire is extremely high.
During this phase, the first step in providing care for the casualty is to gain awareness of the tactical situation. No care should be provided if the casualty is still under heavy enemy fire.
Use the principles of START to move the casualty to a safe position. If there is still a high probability that you may be injured in attempting to retrieve the casualty, instruct others around you to do so. You have a very specialized skillset and the tools needed to provide care for any casualties that occur. If another casualty occurs attempting to retrieve the first, you have the training to treat both. If you are injured attempting to reach the casualty, it diminishes the likelihood of either of you receiving the necessary care.
Casualties who are able to move under their own power to cover should be instructed to do so in order to avoid exposing other caregivers to unnecessary hazards.
Additionally, casualties who have sustained non-life-threatening conditions, and have the ability to remain in the fight should do so, and help provide security for you both as you render aid.
Lastly, it may be the case in certain situations that you are required to delay care in order to secure the environment prior to rendering aid. If momentarily continuing the fight will allow you to secure an area to move yourself and your casualty to cover, then it is often the prudent course of action.
Tactical Combat Care (MARCH)
Care rendered once the medic and casualties are no longer taking effective hostile fire, and have moved to a relatively secure location.
Medical care during this phase is directed toward more in-depth evaluation and treatment. It is at this time when you are no longer under imminent threat that you can conduct a full evaluation, bandage any bleeds which may have just been tourniqueted during care under fire, and assess for less immediate wounds such as pneumotharax or blood loss.
Casualties are not to be discharged until cleared by medical personnel. This ensures the casualty is stable, does not require any further treatment, and provides medics an opportunity to recover any equipment the casualty no longer requires.
3. PROPER RECOVERY OF CASUALTIES (START)
When retrieving a casualty, safety throughout the process should be of utmost priority. Rushing in blindly is the quickest way to turn a single casualty into a MASCAS event and loss of medical personnel. The following steps should be utilized to ensure the casualty is recovered with the least amount of additional injuries to yourself and others in the process.
- Secure: When a casualty occurs, confirm that you are not currently also in the line of fire, and find a secure place to assess the situation
- Threat: Identify what caused the casualty. For distant threats, tracers and bullet impacts are typically your best bet; closer threats may provide audible clues as well
- Action: Suppress or eliminate the threat, if possible, otherwise utilize smoke to obscure the enemy's line of sight by providing concealment between the casualty and what caused the injuries
- Recover: When safe to do so, move the casualty to a safe location, ideally somewhere inside that has already been cleared. Sometimes this may mean that as part of the Action phase you must bypass the casualty to assist in clearing a nearby building, then returning when you know you have a safe place to treat
- Treat: Once casualty has been moved to a safe location, begin administering medical aid
4. MARCH PROTOCOL
The MARCH medical protocol is a TCCC mnemonic designed for treating critically injured patients by prioritizing the most likely preventable causes of death.
| Priority | Category |
|---|---|
| 1 | Massive Hemorrhage |
| 2 | Airway |
| 3 | Respiration (or Breathing) |
| 4 | Circulation |
| 5 | Hypothermia/Head Trauma (not modeled) |
5. CASUALTY COLLECTION POINTS (CCP)
If the situation arises where there are multiple casualties requiring care, a CCP can be established in a safe area away from enemy fire. The CCP will provide a location to conduct triage and treatment to the wounded, while also establishing a singular point for leadership to provide security and direct any additional wounded to be taken to for care. The CCP can also provide a known location for assistance to move to in order to help. Depending upon the tactical situation and the amount of available support, the medic's role may shift from a primary caregiver to triage and supervisor in order to coordinate resources and ensure the optimal care is being provided. Whenever possible, direct others to take on such tasks as bandaging and CPR, leaving yourself available to provide direction and more complex treatments to multiple casualties simultaneously.
When coordinating care, be sure to prioritize those individuals who can have the greatest impact once returned to the fight. Prioritization of care should go as follows:
| Priority | Category | Rationale |
|---|---|---|
| 1 | Medical Personnel | So they can assist with other wounded |
| 2 | Leadership | To coordinate with other units to provide assistance if needed |
| 3 | Critical Weapons Systems | AT if armor is nearby, MG for volume of fire, JTAC if air is needed, etc. |
| 4 | Any Remaining Wounded |
2. MULTIPLE CASUALTY INCIDENT (MCI) AND MASCAS
A Multiple Casualty Incident (MCI) is any sudden influx of casualties, typically 3 or more, or 33% of the element, which will severely impact the element's ability to continue with their tasking until treatment can be provided. The medic on site will call up that they have an MCI and how many casualties are involved, then proceed with setting up a CCP and enlisting the aid of any available nearby units in providing care.
If an MCI develops to the point at which it exceeds the medic's ability to provide proper treatment for all wounded with the resources on site, a MASCAS is declared. The medic will call on the medical net "MASCAS, MASCAS, MASCAS," and provide their current location over the radio, as well as deploy purple smoke to assist others in locating the position quickly. This call will notify all nearby elements that your unit has sustained severe casualties, and all available support will be directed to your location to help provide care.
Be advised: all units will make best speed to come and provide aid, which will diminish the ability for other elements to remain on task, and if you are still under heavy fire could result in additional casualties. We are all one team out there, and sometimes that means taking risks to best assist one another, but the responsibility falls on you to be sure that when you do declare a MASCAS, it is absolutely necessary and not unnecessarily placing others in harm. With that being said, if you are not the individual at the MASCAS, you do still have a responsibility to your current tasking as well. Communicate with your team leader about the situation and try to coordinate the most effective method of response. There may be times when it is more important to stay with your team, and your team leader will make that decision. DO NOT just leave your swim buddy.
3. VEHICLE CASUALTY CARE
In its current state, we are not about to treat any casualty when we are seated in a vehicle beyond bandaging any bleeding they may have. The one exception is on the CH-47, where we can provide all available treatments when we are standing, but if the casualty goes into cardiac arrest while seated, we cannot administer CPR. We also cannot move a casualty from a seated position to the floor, so if they go into cardiac arrest while seated, we either have to unload them from the helicopter or delay treatment.
With this being the case, should we take casualties when preparing to board the helicopter, if the casualty is already unconscious, they should be carried on and laid on the floor. If the casualty is conscious when the helicopter lands and is at risk of passing out, then they should be directed to walk on and lie down on the floor instead of occupying one of the seats until they can be stabilized.
4. ADMINISTRATION OF MEDICAL AID
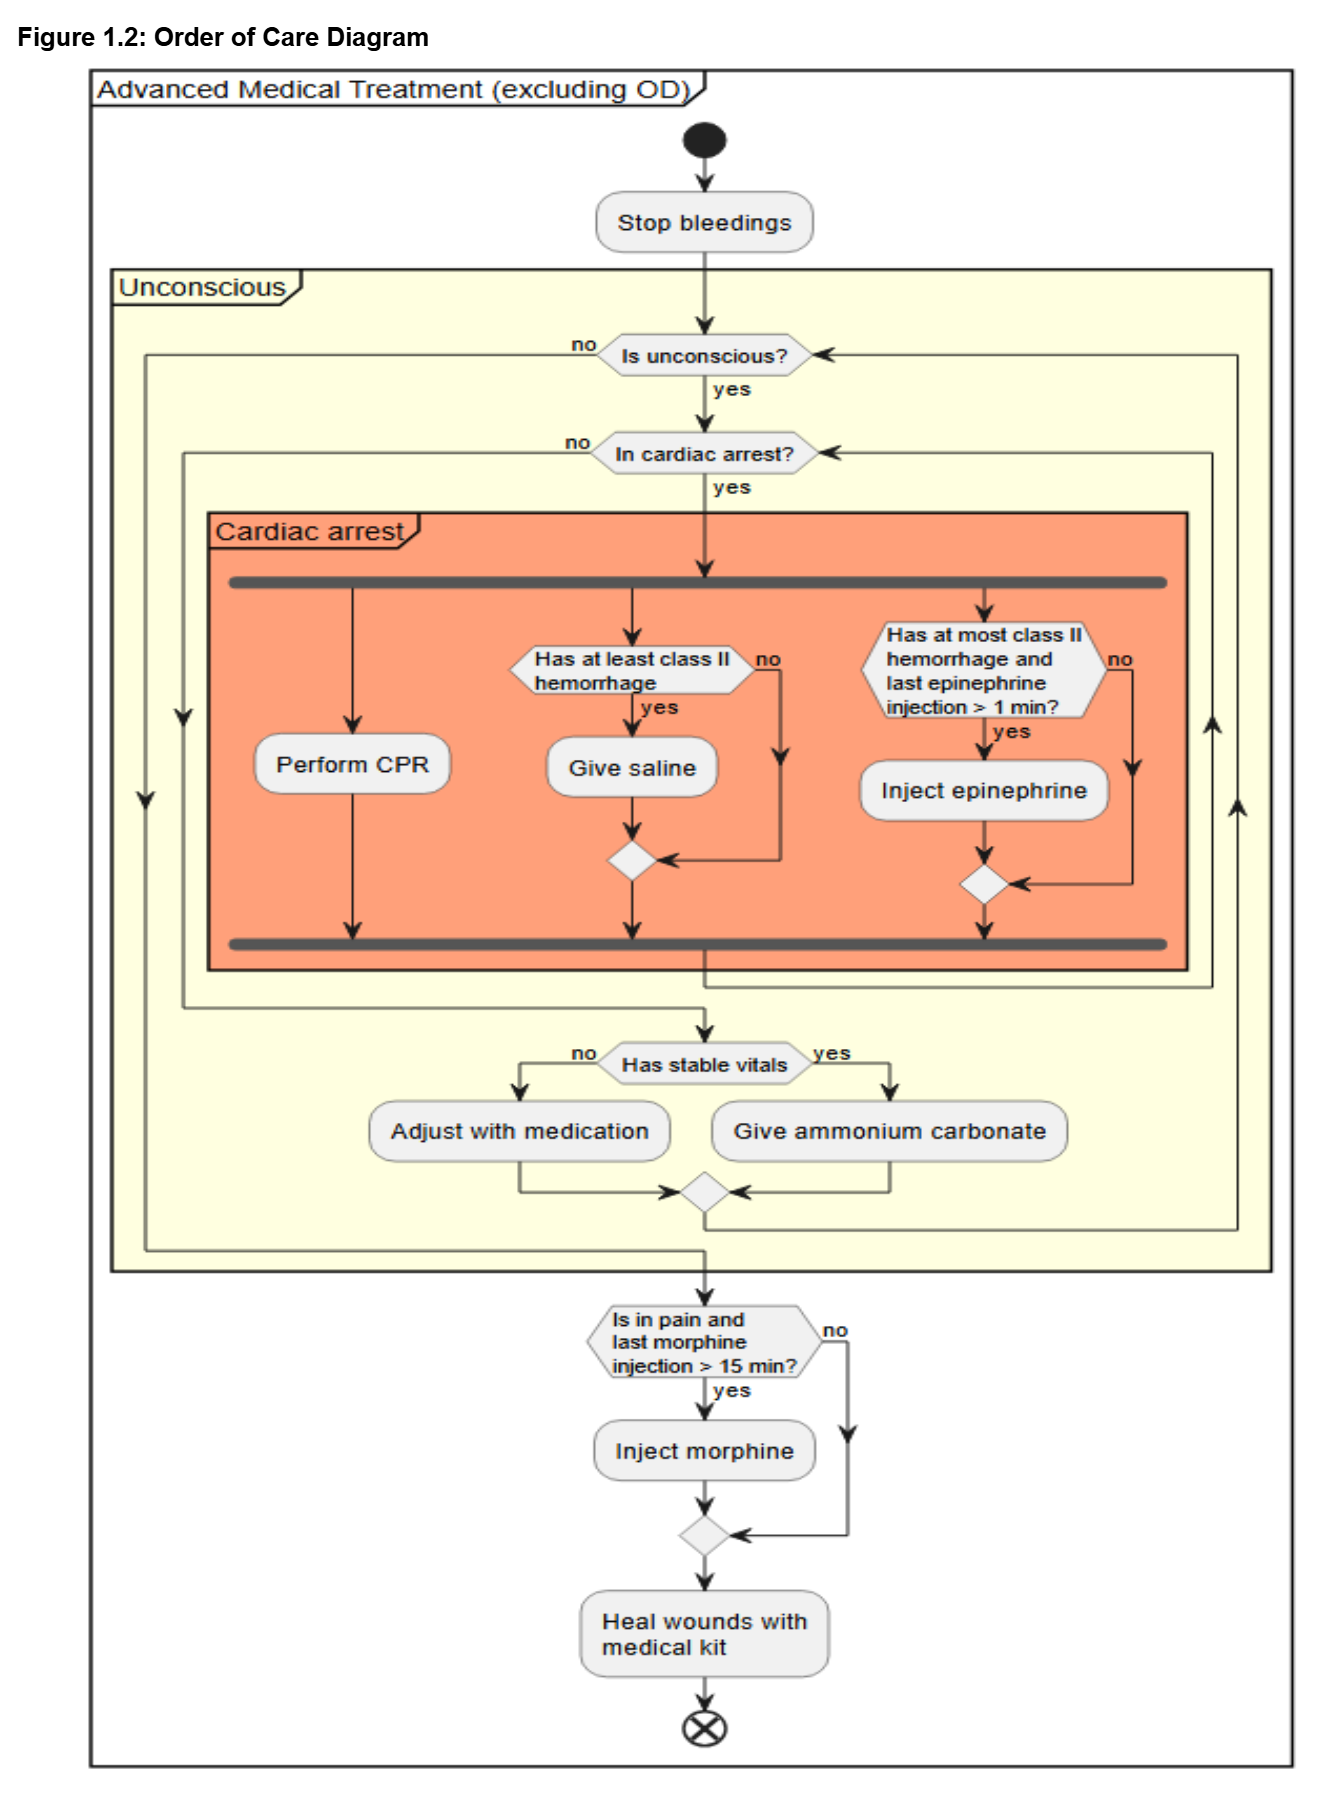
Proper Recovery of Casualties (START)
Secure the casualty and find safe location to treat
Check Injuries
- Bleeding Level (Heavy, Moderate, Light)
- Hemorrhage Class (Class I, II, III, IV)
- If class IV, immediately administer Phenylephrine to slow bleeding
- Pneumothorax (Open vs Tension)
- Massive Hemorrhage
- If limbs are bleeding, use tourniquets to decrease bleed rate
- Once tourniquets are applied, stop bleeding on abdomen, chest, and head if applicable
- If right arm is bleeding, bandage arm and remove tourniquet, then apply saline bag to prevent bleeding out
- Stop any remaining bleeding by applying bandage
- Remove tourniquets if applied
Airway
- If the casualty has a Tension Pneumothorax, use an NCD kit (Note: will result in Open Pneumothorax)
- If the casualty has an Open Pneumothorax, apply chest seal
- If the casualty has an occluded airway, clear vomit, then lift chin
Circulation
- Check the casualty's pulse
- If no pulse, administer Epinephrine and begin CPR
- If pulse is <40, administer Epinephrine without CPR
- If treating the casualty alone, conduct 30 chest compressions, check for airway occlusion, check hemorrhage class/Saline applied, check for pulse, and repeat if necessary
- If treating the casualty with aid, one can conduct compressions while the other checks pulse, airway occlusion, hemorrhage class/saline applied. (Note: pulse must rise above 120 to be stable due to false reading from compressions)
- If the casualty still has no pulse after one minute, re-administer epinephrine and continue CPR cycle
Health
- If the Casualty has pulse, is stable, and saline is being administered, place in Left Recover to prevent occlusion
- Once blood level reaches Class 1 hemorrhage or less, resuscitate casualty by administering Ammonium Carbonate and once conscious administer morphine as necessary
- Once the casualty is conscious, conduct a final scan to ensure that they are indeed stable and do not require any further treatment (i.e. utilization of First Aid Kit to regain movement). This is also when the medic will recover any equipment no longer required to treat casualty injuries (i.e., oxygen mask, King LT, etc.). Casualty is not to be discharged until fully cleared by attending medical personnel.
Figure 1.2: Order of Care Diagram